Originally published at spakegames.com on 10/2/20.
What is the simplest game menu?

All you need to do to achieve the above is to link your Play button to a script, and then tell Godot to switch to your game scene when Play is pressed. It's easy:
func _on_PlayButton_pressed():
	get_tree().change_scene("res://Level.tscn")
I would argue the above is too easy, because the result will be almost (though not quite) the same as loading directly into the game. Personally, at least for a web game, I prefer to have at least this much:
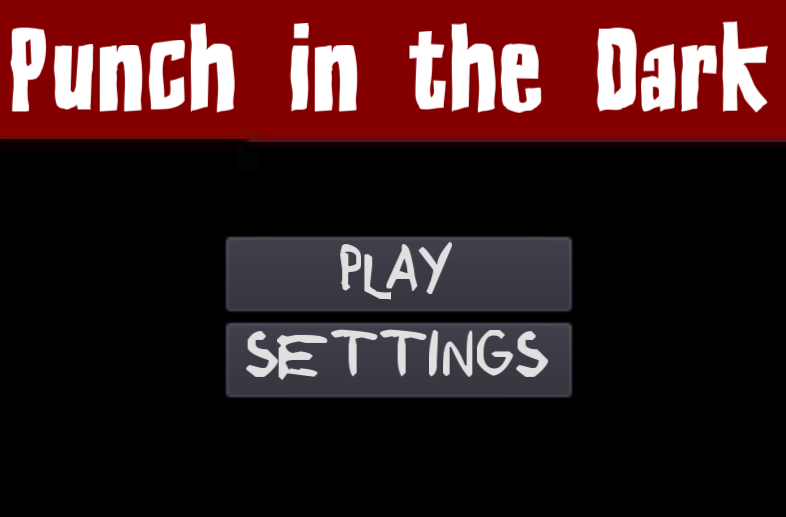
The components of the above are:
- A title label (optional, I suppose).
- A background.
- A play button to launch into the game.
- A settings button that makes visible an imported Settings scene.
I'll go over the Main Menu first, and cover the imported Settings scene next. For a downloadable title you'll also want a Quit button, which can be setup as easily as a Play button:
func _on_QuitButton_pressed():
	get_tree().quit()
There's several ways you could handle a Main Menu. If your game is light enough, you could have your Main Menu as a Popup over your actual game. However, I prefer to load my Main Menu before and outside of my game, so this is the method I'll be going over.
First, you'll want to make a new User Interface scene:
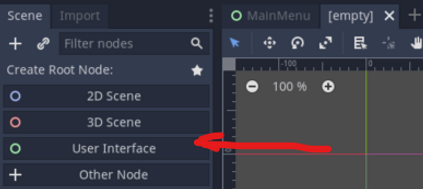
It's possible you could set up the Main Menu as a 2D or 3D scene instead. I haven't tried that yet.
Now, every scene begins with a default view that is essentially your camera. The player will only see what is in this view unless you manually add a camera node. You can always confirm the scene view by looking for a faint blue outline in a scene view.
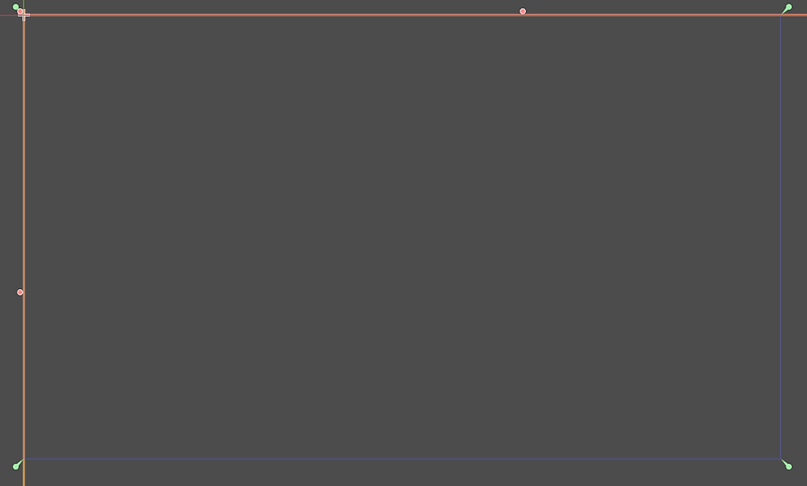
This is important to remember when you're building a menu or other scene that wouldn't normally need a camera. You can adjust the size of your window, which defines the size of your default scene view, under Project > Project Settings > Display > Window by modifying the Width, Height, Test Width, and Test Height values.
A brief aside: Width and Height under Project Settings impact the size of Godot's view within a game. Test Width and Test Height, on the other hand, define how large a game window will actually be. This seems intended to assist you with matching the aesthetic achieved by outdated resolutions. For example: Say you wanted to make a game in the style of the original Gameboy, which had a resolution of 160x144, but you'd like to play your game on a modern PC. If you set the Width and Height of your game to 160x144, and set Test Width and Test Height to a resolution like 960x864, you'll actually be able to see when you play!
Getting back to the Main Menu, my usual next step is to add a background of some kind. You can use a sprite fit to your target resolution, or you can just add a ColorRect node to the scene, scale it until it completely fills the view, and set your preferred color.
With a background in place, add a Label to serve as your Title and center it at the top of your view.
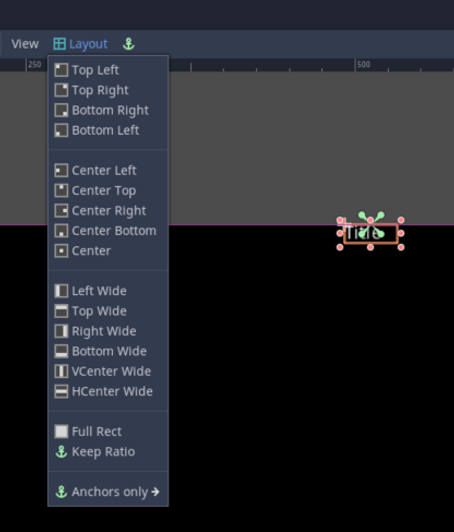
You'll probably want to add some space between your Label title and the top of the view. You can do this by selecting your Label and, under Control, expanding Margin and adding however much distance you need next to Top. Example:
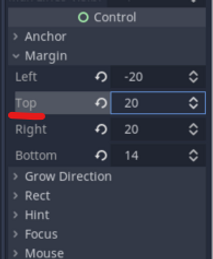
I personally prefer setting the Label's anchor and modifying the Margin to manually modifying positions for nodes of the Control type, but you can also set the Label's position if you prefer.
This would be a good point to add a custom font, if you have one, to your Label by expanding Custom Fonts and setting up a new Dynamic or Bitmap font, as appropriate. There's alot of good information on fonts out there, so I'm skipping it for now.
For your next step, you can start adding Button nodes or you can add a VBoxContainer first for a cleaner appearance. If you do add a VBoxContainer, you'll want to center it in your view and make all the Buttons you add children of it.
Now, before I go over the Settings Button, I'll first cover the imported Settings Popup scene I mentioned earlier.
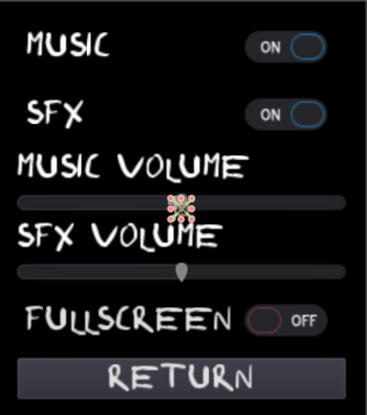
Now, this isn't the simplest Settings Popup, but I like how it looks so it's what I've been using. This menu is composed of:
- A sized black ColorRect for a background.
- A VBoxContainer for a clean-ish appearance and ordering of elements.
- 5 Labels to define for a player what they're looking at.
- 3 CheckButtons, 2 for audio and 1 to make the window full screen (this works in FireFox in addition to downloadable titles, not sure about other browsers).
- 1 Return Button to hide the Popup window.
The code for this Settings Popup is clunky, but straight forward. We start with our variables:
extends Popup

export var music_audio_bus := "MusicChannel"
export var sfx_audio_bus := "SFXChannel"
onready var music_bus := AudioServer.get_bus_index(music_audio_bus)
onready var sfx_bus := AudioServer.get_bus_index(sfx_audio_bus)
onready var music_slider = $VBoxContainer/MusicHSlider
onready var sfx_slider = $VBoxContainer/SoundHSlider
onready var music_checkbutton = $VBoxContainer/MusicCheckButton
onready var sfx_checkbutton = $VBoxContainer/FXCheckButton
var music_new_val = null
var sfx_new_val = null
I picked up some of this from a KidsCanCode tutorial. I'm not a fan of KidsCanCode, and I try to avoid recommending them, but as a last resort they can sometimes be helpful. The
export var music_audio_bus := "MusicChannel"
export var sfx_audio_bus := "SFXChannel"
bits are taken from that tutorial, and are intended to reference 2 audio buses I set up within my project. By default (depending on if/how you customize Godot), you can check your audio buses by selecting the "Audio" tab at the bottom of the Godot window.
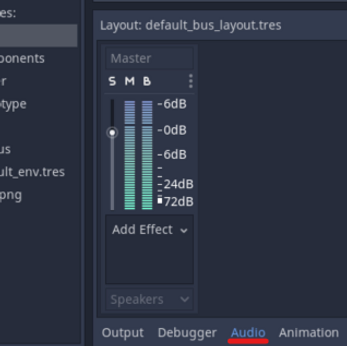
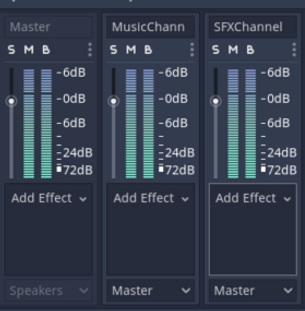
Every project is created with 1 "Master" audio bus. If you don't care to separate your music from your sound effects, you can simply pipe all of your game audio through this bus. However, if you appreciate the ability to customize your audio experience, I've found it's helpful to add additional audio buses labeled after their function. For example, for my Punch in the Dark project, I created additional and separate Music and SFX buses and left the Master bus alone (you cannot delete it).
The _ready function for my script is all about trying to ensure audio values remain consistent between scenes (the Settings Popup can be pulled up from within a running game).
func _ready():
	AudioServer.set_bus_mute(music_bus,!Global.music_on)
	AudioServer.set_bus_mute(sfx_bus,!Global.sfx_on)
	music_checkbutton.pressed = Global.music_on
	sfx_checkbutton.pressed = Global.sfx_on
	music_slider.value = Global.music_val
	sfx_slider.value = Global.sfx_val
	music_new_val = db2linear(AudioServer.get_bus_volume_db(music_bus))
	sfx_new_val = db2linear(AudioServer.get_bus_volume_db(sfx_bus))
AudioServer.set_bus_mute checks and sets an audio bus to be muted, depending on what setting were recorded in an external Global script. For example, if a player sets music to be muted from the Main Menu before starting the game, the Settings Popup will then enforce the mute while the game is running.
The mentioned Global script is referenced to determine if the Music and SFX CheckButtons should show that mute is currently enabled or not. The buttons themselves have no awareness outside the currently loaded scene, and you will need to manually set them if you want them to be useful.
I actually don't check if fullscreen is enabled in the script. So, if you set my game to be fullscreen from the Main Menu before pressing Play and then open the Settings Popup from the ingame menu, fullscreen will appear to be set to off. The button will still work to toggle fullscreen, but the value of the button will always appear to be opposite what it's supposed to be.
The remaining code of _ready, like that used to get and set whether mute is enabled, is intended to synchronize the currently set volume. The Settings music and sound effects sliders are set to the value they possessed before the scene changed, and
music_new_val = db2linear(AudioServer.get_bus_volume_db(music_bus))
sfx_new_val = db2linear(AudioServer.get_bus_volume_db(sfx_bus))
get the current bus volume. The bus volume value appears to carry between scenes, so I haven't tried to set it.
The remaining code is all tied to buttons or sliders. First are the music and sound effect buttons, which are similar enough that a real coder could find a way to simplify by calling out to an additional function probably:
func _on_MusicCheckButton_pressed():
	if AudioServer.is_bus_mute(music_bus) == false:
		AudioServer.set_bus_mute(music_bus,true)
		Global.music_on = false
		print(Global.music_on)
	elif AudioServer.is_bus_mute(music_bus) == true:
		AudioServer.set_bus_mute(music_bus,false)
		Global.music_on = true
		print(Global.music_on)


func _on_FXCheckButton_pressed():
	if AudioServer.is_bus_mute(sfx_bus) == false:
		AudioServer.set_bus_mute(sfx_bus,true)
		Global.sfx_on = false
		print(Global.sfx_on)
	elif AudioServer.is_bus_mute(sfx_bus) == true:
		AudioServer.set_bus_mute(sfx_bus,false)
		Global.sfx_on = true
		print(Global.sfx_on)
When the music or sound effects buttons are pressed, both will either mute or unmute the given audio bus depending on the previous state of the bus. Both buttons will also notify the Global script of the state change by setting a binary value in Global to true or false as appropriate.
The sliders are also extremely straight forward in execution:
func _on_MusicHSlider_value_changed(value):
	Global.music_val = value
	AudioServer.set_bus_volume_db(music_bus, linear2db(value))


func _on_SoundHSlider_value_changed(value):
	Global.sfx_val = value
	AudioServer.set_bus_volume_db(sfx_bus, linear2db(value))
When a slider's value changes, the value is sent to the selected audio bus and the Global value tracker to update them.
The following is the laziest way possible to achieve fullscreen. You're welcome.
func _on_FullscreenCheckButton_pressed():
	OS.window_fullscreen = !OS.window_fullscreen
If the window is not fullscreen, selecting the CheckButton will set fullscreen and vice versa.
Finally, when the player is done, they can select Return to hide the Settings Popup:
func _on_ReturnButton_pressed():
	self.visible = false
Unlike physics or many game elements, a hidden Popup node cannot be interacted with and is essentially gone from the scene until it is revealed again.
All of this basic menu stuff is so easy I don't know why I put it off learning it for so long. Any project I make that is not intended for a 3 hour game jam, going forward, will have a menu of at least some kind.
Speaking of 3 hour game jams, I signed up for and took part in one last weekend. The experience was amazing, if only because I actually managed to finish something playable, and it shifted my view of where I'm at as a game developer.
I'll talk more about all that on the 18th. Until then.

No comments:
Post a Comment